Check out this cool site: xkcd.com


Check out this cool site: xkcd.com
ldapsearch -b DC=deadlycoffee,DC=com -h ldapserver -D CN=”James T. Kirk,OU=USSENT01,OU=FEDERATION,DC=deadlycoffee,DC=com” -w “$PASSWORD” “(sAMAccountName=jtk*)”
Make sure you use the same CN that you find with this Windows graphical tool:
1. Create the database with tables labelled with hostname,date, and all the vmstat fields in order. Put a unique constraint on the hostname_date.
$ vmstat 1 1 | grep avm
r b avm fre re pi po fr sr cy in sy cs us sy id wa pc ec
2. setup a command to pipe inserts right into the database, in my case I pipe into a remote command:
echo “insert command to generate” | ssh $remotehost sql
‘sql’ above is a script that connects via tds to a Windows database ( yea I know, Windows ).
3. Create a simple capture job and run it every 15 minutes:

4. I just run this command every 15 minutes. Because of constraints anything already loaded just fails.
( loadvmstat “09-25-2008” ; echo ; echo ) | ssh nad0019linux01 sql
Here is an example of a report made with MicroSoft Visual Studio pulling from the database ( double click to see the details ):

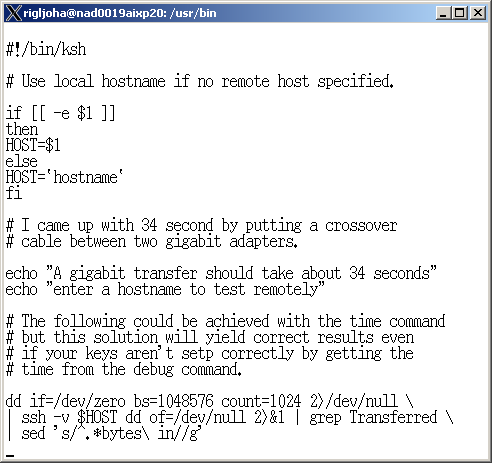
This is a hack that any true network admin. would probably shoot holes in, but for me it works pretty good. It simply initiates a transfer of 1GB across the main network interface. If you specify a remote server, it transfers it, otherwise you transfer to yourself. Dev null and dev zero are used to remove disk access from the equation:
I was cloning a system from a NIM mksysb at AIX 5.3 ML 7 and chose the option to ‘reduce the filesystem’ sizes. This seemed to work fine, but it reduced the size of /tmp to a point that it could not create a boot image when it got to that part of the install. No problem, I just went to the maintenance shell, removed some useless files, and reran the command. The bosboot worked fine. When I exited from the maintenance shell, the install continued and finished successfully. Unless you get failures during the actual restore command, you can often figure out what went wrong and just continue. Sysback operates the same way. It appears to have retried the command, because when I continued on, it looks like it tried the mksysb again:
0301-152 bosboot: not enough file space to create:
         bootimage
         /tmp has 31164 free KB.
         bootimage needs 36242 KB.

BOS Install: Could not create boot image.
   ID#        OPTION
     1        Continue
     2        Perform System Maintenance and Then Continue
   Enter ID number: 2

# bosboot -ad /dev/hdisk0

0301-152 bosboot: not enough file space to create:
         bootimage
         /tmp has 31160 free KB.
         bootimage needs 36242 KB.
# cd /tmp

(Remove a bunch of extra stuff you don't need anyway, in this case old Oracle dumps or patch installs)

# bosboot -ad /dev/hdisk0

bosboot: Boot image is 35867 512 byte blocks.
# exit


         Please wait...

        Approximate     Elapsed time
     % tasks complete   (in minutes)

          87               14      Creating boot image.

   Copyright BULL 1993, 2007.
   Copyright Digi International Inc. 1988-1993.
   Copyright Interactive Systems Corporation 1985, 1991.
...

 US Government Users Restricted Rights - Use, duplication or disclosure
 restricted by GSA ADP Schedule Contract with IBM Corp.

forced unmount of /var
Rebooting . . .


        Approximate     Elapsed time
     % tasks complete   (in minutes)


          87               14      Creating boot image.


   Copyright BULL 1993, 2007.
   Copyright Digi International Inc. 1988-1993.
   Copyright Interactive Systems Corporation 1985, 1991.
   Copyright ISQUARE, Inc. 1990.
   Copyright Mentat Inc. 1990, 1991.
   Copyright Open Software Foundation, Inc. 1989, 1994.
   Copyright Sun Microsystems, Inc. 1984, 1985, 1986, 1987, 1988, 1991.

 All rights reserved.
 US Government Users Restricted Rights - Use, duplication or disclosure
 restricted by GSA ADP Schedule Contract with IBM Corp.

forced unmount of /var
Rebooting . . .
After that everything works fine.
GPFS can be cryptic compared to AIX. But tonight, I needed to replace one disk with another since we are going to get rid of one of our SANs. I got my new disks and added them with mmcrnsd and mmadddisk, then I ran a delete. About 5 hours later I began to wonder if the process had gone astray. In GPFS, the delete will migrate everything off before deleting instead of throwing an error, if it can. Of course in the mean time it will give you pretty scary messages:
Attention: Due to an earlier configuration change the file system
may contain data that is at risk of being lost.
Now this may be true, but it just scary. When you look it up in the manual, it tells you to balance at your earliest convenience. There is a pretty big difference in tone between ‘risk of being lost’ and balance at your earliest convenience. On top of this, the command stops giving status and just appears to hang.
55 % complete on Sat Aug 16 20:28:42 2008
59 % complete on Sat Aug 16 20:28:45 2008
62 % complete on Sat Aug 16 20:28:48 2008
65 % complete on Sat Aug 16 20:28:51 2008
100 % complete on Sat Aug 16 20:28:52 2008
Scan completed successfully.
Scanning file system metadata, phase 3 …
Scan completed successfully.
Scanning user file metadata …
99 % complete on Sat Aug 16 20:30:00 2008
( no more output for 6 hours, I am assuming that this command would background if I disconnected)
100 % complete on Sun Aug 17 01:15:22 2008
Scan completed successfully.
tsdeldisk completed.
mmdeldisk: Propagating the changes to all affected nodes.
This is an asynchronous process.
#
#
#
#
#
I made my own status command with a simple loop:
while true
do
mmdf mydatabasefs| grep nsd_1784_02
done
This takes a little while to run each time so it is like having a sleep between status lines:
nsd_1784_02 262144000 1784 yes yes 259610256 (99%) 1142 ( 0%) *
nsd_1784_02 262144000 1784 yes yes 259630832 (99%) 1142 ( 0%) *
nsd_1784_02 262144000 1784 yes yes 259651424 (99%) 1134 ( 0%) *
The 99% is the key, after 6 hours, all the data is just about migrated off of this disk.
After this is done, the really scary message above is replaced with a slightly less scare one, with the same remedy advised:
Attention: Due to an earlier configuration change the file system
is no longer properly replicated.
So we all know how to write a boot image to a disk (bosboot -ad /dev/hdisk0) and how to set the bootlist (bootlist -m normal hdisk0 hdisk1).
You also want to check in the /dev directory to make sure you have your links set up correctly:
# ls -l | grep -i ipl
crw-rw—- 1 root system 10, 0 Jul 14 2006 IPL_rootvg
crw-rw—- 2 root system 10, 1 Jul 14 2006 ipl_blv (should be same as rhd5)
crw——- 2 root system 20, 0 Aug 13 11:10 ipldevice (should be same as rhdisk1, in this case)
# ls -l | grep hdisk1
brw——- 1 root system 20, 0 Aug 13 11:20 hdisk1
crw——- 2 root system 20, 0 Aug 13 11:10 rhdisk1
# ls -l | grep hd5
brw-rw—- 1 root system 10, 1 Aug 13 11:37 hd5
crw-rw—- 2 root system 10, 1 Jul 14 2006 rhd5
If you see something wrong, for example ipldevice points to the wrong disk, just rm the ipldevice pseudofile and relink it ( ln rhdisk1 ipldevice )
Also, support has me run this command that list out all bootable disks even if they are’t part of rootvg ( you get that with vio disks that are in rootvg for a client):
# ipl_varyon -i
PVNAME BOOT DEVICE PVID VOLUME GROUP ID
hdisk0 NO 00031691bced4a4e0000000000000000 00c1b3da00004c00
hdisk2 NO 00cdeaeadfcd0ebc0000000000000000 00c1b3da00004c00
hdisk1 YES 00031691bcd549a60000000000000000 00cdeaea00004c00
It seems like this command should be easier, but it is a little crazy. Lets say that I don’t know that sshd is listening on port 22. Here is how to arrive at that:
# netstat -Aan | head
Active Internet connections (including servers)
PCB/ADDR Proto Recv-Q Send-Q Local Address Foreign Address (state)
f100060001be4b98 tcp4 0 0 *.13 *.* LISTEN
f100060001bf7b98 tcp 0 0 *.21 *.* LISTEN
f100060001f60398 tcp4 0 0 *.22 *.* LISTEN
f100060001bf4b98 tcp 0 0 *.23 *.* LISTEN
# rmsock f100060001f60398 tcpcb
The socket 0x1f60008 is being held by proccess 266380 (sshd).
#
You could also use lsof with the socket #, but I don’t usually load that.
Two quick things about telnet:
So to check ports with telnet, simply add the port number ( here is a test to see if ftp is enabled):
# telnet deadlycoffee.com 21
Trying…
Connected to deadlycoffee.com.
Escape character is ‘^]’.
220———- Welcome to Pure-FTPd [TLS] ———-
220-You are user number 1 of 50 allowed.
220-Local time is now 13:08. Server port: 21.
220 You will be disconnected after 15 minutes of inactivity.
help
214-The following SITE commands are recognized
ALIAS
CHMOD
IDLE
UTIME
214 Pure-FTPd – http://pureftpd.org/
quit
221-Goodbye. You uploaded 0 and downloaded 0 kbytes.
221 Logout.
Connection closed.
#
Next, there are all sort of switches and other systems that I need to get information from that aren’t ssh enabled. Here is a crude way to accomplish what you want with telnet:
(
echo “$USERNAME”
sleep 1
echo “$PASSWORD”
sleep 1
echo “show switch”
sleep 2
) | telnet $HOST
Lquerypv will simply read the data from the disk and display it in a format similar to octal dump (od). In the example below, we see the PVID written to the disk at location 80. You seem to be able to read anything that you point lquerypv at (I tried /etc/motd and read it just fine). This is great for reading the PVID of a logical volume on a vio server that is pretending to be a virtual disk on a client since you can’t see that information with lspv. Lquerypv is also a great command for figuring out where disk access issues are. If lquerypv returns any data, then you can read the disk and it isn’t a reserve issue. If it can’t read any data, and just hangs or returns nothing, then ABSOLUTELY NO OTHER AIX COMMAND WILL WORK. At this point you should stop looking at your filesystems or volume groups and logical volumes. The issue is that you simply can’t read the disks, and you need to either go to the vio server and see if there is a problem there or use lsattr -El hdisk0 to check the scsi reserve (on another system that might be sharing the disk). If you the issue is on your VIO server, or you have direct-attached SAN disks, then ask your SAN administrators to check their stuff. If, however queries against all of our disk hang, especially during an initial install, then maybe your client SAN software is messed up, you could try to remove it and use the MPIO version or just re-install it. The clearest sign of one disk with a reserve lock at the san level is when lquerypv returns nothing and lquerypv against other disks works fine.
# lspv
hdisk0          00031691bced4a4e                    oraclevg        active
hdisk2          00cdeaeadfcd0ebc                    oraclevg        active
hdisk1          00031691bcd549a6                    rootvg          active
# lquerypv -h /dev/hdisk0
00000000   C9C2D4C1 00000000 00000000 00000000  |................|
00000010   00000000 00000000 00000000 00000000  |................|
00000020   00000000 00000000 00000000 00000000  |................|
00000030   00000000 00000000 00000000 00000000  |................|
00000040   00000000 00000000 00000000 00000000  |................|
00000050   00000000 00000000 00000000 00000000  |................|
00000060   00000000 00000000 00000000 00000000  |................|
00000070   00000000 00000000 00000000 00000000  |................|
00000080   00031691 BCED4A4E 00000000 00000000  |......JN........|
00000090   00000000 00000000 00000000 00000000  |................|
000000A0   00000000 00000000 00000000 00000000  |................|
000000B0   00000000 00000000 00000000 00000000  |................|
000000C0   00000000 00000000 00000000 00000000  |................|
000000D0   00000000 00000000 00000000 00000000  |................|
000000E0   00000000 00000000 00000000 00000000  |................|
000000F0   00000000 00000000 00000000 00000000  |................|
#